Acts of Love and Kindness Chart

Commit.

And you must commit yourselves wholeheartedly to these commands that I am giving you today. Repeat them again and again to your children. Talk about them when you are at home and when you are on the road, when you are going to bed and when you are getting up. Tie them to your hands and wear them on your forehead as reminders. Write them on the doorposts of your house and on your gates.” Deuteronomy 6:6-9

Commit.

It’s my focus word for 2018. I’ve chosen to commit to teaching my children (and others) about Jesus. Of course, I will continue to teach my children about Jesus and weave it, hopefully, ever so seamlessly into my parenting beyond just this year. But, this year, this is the year that’s going to get me started on that path!

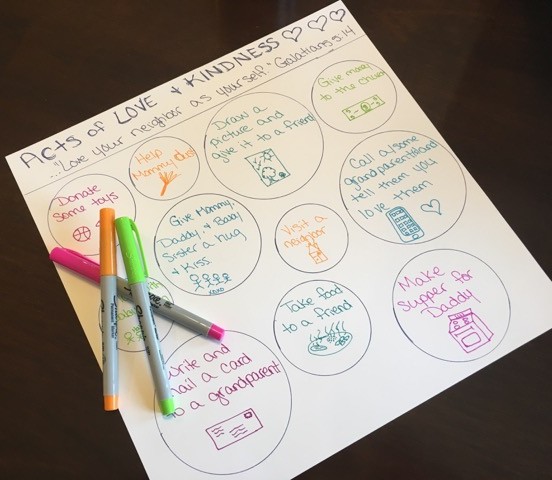
Last month my 2.5 year old and I (who am I kidding, it was just me) created an ‘Acts of Love and Kindness’ chart. At this point, you’re probably assuming I’m going to link you to a pin on Pinterest showing you where I found this idea. Am I right?? Well, guess what!? I did NOT find this on Pinterest, although I’m sure it’s out there :). I came up with the idea on my own! Actually, I take that back. I’m SURE the idea was given to me by the Good Lord above. I do NOT come up with ideas like this so easily!

Below the title of the chart, I included the second half of Galatians 5:14, For the whole law can be summed up in this one command: ‘Love your neighbor as yourself.’” Each circle on the chart represents something my daughter can do for someone else that is kind or loving. Every time she does something that’s on the chart, she puts a sticker in the corresponding circle. We love it!

IMG_5935

I’d love to hear your ideas! What ways do you teach your children about Jesus and how to be like him?

Kitchen Makeover

Back in mid-May I began our kitchen makeover. It was quite the project, with the DIY pieces taking over 55 hours to complete. Yikes :/. I’m so happy with the finished product, though!

I’ll give you a quick before and after photo before explaining all the changes we made.

Before

After

I just love it :). Ok, now for all the changes…  Continue reading »

Kitchen Project: Sherwin Williams ProClassic Paint

I’ve now completed two cabinet painting projects. The first one was our bathroom vanity. You can read about that here. The second one was our kitchen cabinets. This was a MUCH larger project than the bathroom vanity, but it was SO worth every bit of the 50+ hours it took to complete the project. Thankfully I had some help from a good friend and the hubs!

I used different paint for the kitchen cabinets than I did for the bathroom (per a recommendation from a friend’s mom who knows a professional painter), and boy, I’m glad I did!

I used Benjamin Moore Fresh Start primer and Sherwin Williams ProClassic paint. The picture below shows the primer in white, but I actually used the deep base version and had it tinted. My paint color was Stratus by Valspar. Sherwin Williams color matched it perfectly.proclassic paint

Ok, so the Sherwin Williams paint, it’s expensive (I paid $50 for one gallon, and that was with 30% off), but it was worth every penny! This paint is amazing. It goes on thick, pretty much self-levels so you don’t have to mess with it much, and dries without that tacky/sticky feel that some cheaper paints have. It also dries quickly. I highly recommend it for painting cabinets.  Continue reading »

Update: Brass Be Gone!

Two years ago at about the same time I started this blog (Wow – I can’t believe it’s been that long ago!), I spray painted the knobs and hinges on the interior doors of our home. In that post, I told you I would keep you updated, so here’s the update! Continue reading »

Bathroom Vanity Redo

A few months ago, my husband and I decided to redo the vanity in our guest bathroom. We already painted the walls and bought a new shower curtain a couple years ago, but we still needed to spruce up the vanity. I’ll share with you the process of painting cabinets Fallon-style (aka – I have no idea if I did this correctly, but I think the cabinets turned out great!).

Here are the before pictures: Continue reading »

Craft Booth…Take One

My dad and I participated in our first ever craft fair this past weekend. It was quite the experience, and we learned a lot!

Pictures of our booth are below. I was happy with it for our first ever booth display. It just seemed so overwhelming, though – too much stuff in too small of a space.

We learned from other vendors that it’s not so much about having a ton of items as it is about having a really eye-catching display. Which, of course, makes sense. After seeing other craft booths over the weekend, we now have ideas about how to make our booth more inviting.

We plan to do this again, but need time to recuperate. Craft Booth…Take Two may have to wait a year :). This was exhausting! Lol.

DSC02715

DSC02721

DSC02722

DSC02728

DSC02727

DSC02742

Check out my Shop to see the currently listed items.

What suggestions do you have about creating a successful craft booth?

DIY Personalized Ornate Frame

I have been looking all over for my inspiration picture and can’t seem to find it anywhere on my computer! Ugh. I guess I’ll just have to show you the final products by themselves.

Here are the personalized ornate frames I made for a couple individuals:

DSC02210

DSC02344

Here’s how to make it…   Continue reading »

Open for Business

July marks the first month of owning an Etsy shop!

Click here or ‘Shop’ at the top of this page to see items for sale and/or visit my Etsy shop.

After the craft festival later this year, I’ll add more items to my shop. For now, though, the large majority of items I make have to be saved for the festival.

Any tips on being a successful Etsy shop owner?


For Sale

Recently, I began selling some of my crafts at a local store. I’m so excited! I hope to have an Etsy shop soon…we’ll see. Be sure to check back in the coming weeks to see if I’ve opened one :). Below are some of the items I took to the local store – chalkboards, chicken wire frames, earring and necklace holders, and ‘I love you because…’ dry erase frames.

Items for SaleItems for Sale


Here are some other items I’ve made…

Do you have any business tips for me???

Chicken Wire Frame

My dad and I are selling crafts at a festival later this year. Here is one item I plan to sell (if I don’t end up keeping it for my own house :)).

DSC01478

Simply staple chicken wire to a picture frame. The frame I used was about 24×21 inches from outer edge to outer edge. I did spray paint the picture frame first – I didn’t like the wood color it was originally, so I used a silvery colored spray paint. When I was finished, it looked too bland, so I added the fabric flowers.

This makes a great picture frame, as it allows you to quickly and easily switch out pictures as often as you like. You could also use it as a place to leave messages, love notes, lists of chores…the possibilities are endless :)!

I will definitely be making more of these.

Happy framing!