This is the last in a series of three posts regarding our master bedroom decorations. To see the other parts of the project, click here (tricks for deciding décor placement) and here (making your own decorative canvases).
Originally, this is what the finished wall décor looked like:
It just didn’t seem quite finished. It was too boring and needed more color. Pinterest is always full of pins about painting your own vases, so I decided to give it a try.
I used leftover paint from redoing our bedroom and painted the inside of the vases. It’s simple, just pour some paint in the vase, turn the vase on its side and twirl it around until the entire vase is covered with paint. Place the vase upside down to let the excess paint run out. It works best if you can set it on some type of grate which allows air to flow through the vase. My ‘grate’ was the door off of our cat carrier. Lol – improvisation at its best!
The paint will take a day or more to dry completely – at least mine did. You may also find some cracks in the paint. I didn’t mind this. I thought it added character (plus you can’t really see the cracks unless you are very close).
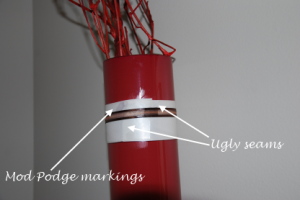
I added a little more detail using two styles of ribbon. I glued these to the vase using Mod Podge. I only used Mod Podge where the seams of the ribbons came together. These seams are noticeable and ugly (see pic below), which is why I faced them toward the wall. I wouldn’t suggest using ribbon in this way if you plan to place your vase where the back is visible as well. What you might want to do instead is just tie the ribbons in a bow and put a dab of Mod Podge behind the knot of the bow to keep it in place. It will look finished all the way around if you use ribbon in this way.
The red ‘sprigs,’ as I like to call them, I found at a craft store for a few dollars. The vases were a dollar or so at a rummage sale. The two spools of ribbon came from Michaels and cost a few dollars each. Total cost of the project = VERY CHEAP!
Check out the before and afters:
As I’ve said before, please forgive the photography skills :). I’ll improve one of these days.


